



With the right planting technique, a single pot on a balcony or terrace can produce fresh blooms time and again over several months. The ‘lasagne’ method for flower bulbs is based on the so-called lasagne principle: different flower bulbs are planted layer by layer in a planter. Each layer contains varieties with different flowering times. This results in staggered flowering, with the first early-flowering varieties appearing as early as March and later varieties following through into May.
This method saves space and is ideal for small balconies, terraces or window-box plantings. With a well-thought-out selection of bulbs and suitable colour combinations, you can create a continuously flowering planter from a single pot. Our gardening blog is the perfect place to find all the information you need!
How the lasagne method works
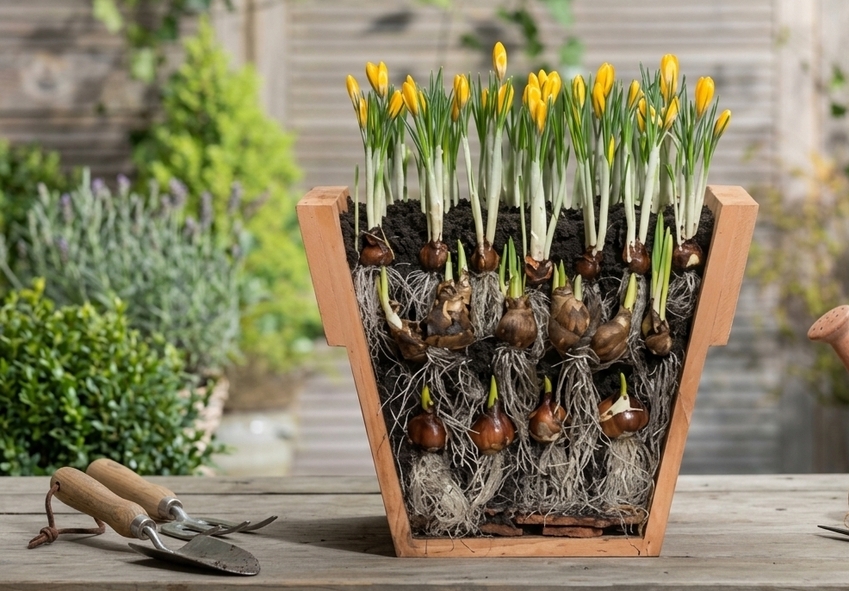
The basic principle of the lasagne method is simple: large, late-flowering bulbs are placed at the very bottom, whilst smaller, early-flowering varieties are placed in the upper layers. When layering flower bulbs in a planter, the bulbs are therefore not arranged at random, but combined according to their size, planting depth and flowering time.
The bottom layer usually consists of the largest and latest-flowering varieties. Above this comes a middle layer of bulbs that flower in April. The top layer is reserved for small, early-flowering varieties that bring colour to the planter as early as March.
This layered planting of flower bulbs works because the shoots of the bulbs in the lower layers can find their way between the bulbs above them. The bulbs are not laid on top of one another in a solid layer, but are spaced out sufficiently. This allows the shoots to grow upwards without causing significant damage to the other bulbs.
What you’ll need for planting
Before planting flower bulbs in a pot, you should choose a pot that is large enough and frost-resistant. Drainage holes in the base are particularly important to allow excess water to drain away. The pot should ideally be at least 30 to 40 cm deep to ensure there is enough space for several layers of bulbs.
A drainage layer of expanded clay, gravel or pottery shards is suitable for the bottom layer. This aids water drainage and helps prevent waterlogging. On top of this, fill the pot with a high-quality, loose and well-draining potting mix.
As well as a frost-resistant planter, you will need suitable flower bulbs with different flowering times. Combine early-flowering, mid- to late-flowering and late-flowering varieties so that the succession of blooms lasts as long as possible. Also ensure that the selected varieties have similar requirements in terms of light and moisture.
Step by step: planting flower bulbs in layers
The ‘lasagne’ method for planting bulbs is easy to follow if you build up the individual layers from the bottom up.
Step 1: Prepare the drainage
First, fill the bottom of the planter with a layer of expanded clay, gravel or broken pottery about 3 to 5 cm deep. This drainage layer prevents water from pooling at the bottom. Next, add a first layer of potting compost about 5 to 8 cm thick on top.
Step 2: The bottom layer for flowering in May
Place the largest and late-flowering bulbs in the bottom layer. Late-flowering tulips or alliums, for example, are well suited. Arrange the bulbs on the compost with the tip facing upwards and the root end facing downwards. Then cover the bulbs with a sufficient layer of compost. The exact amount depends on the size of the bulbs and their recommended planting depth.
Step 3: The middle layer for April
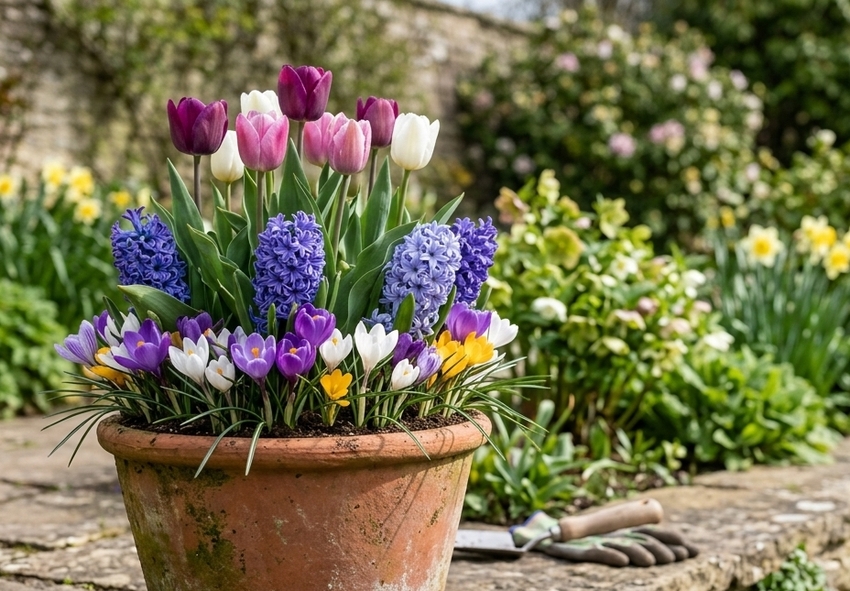
The next layer of soil is followed by medium-sized bulbs, which appear later than the early-flowering varieties but earlier than the late-flowering bulbs at the bottom. Daffodils and hyacinths are particularly well suited for this. Plant the bulbs in a staggered pattern relative to the plants below. The middle planting layer is then covered with soil again. This ensures there is enough space between the individual bulbs for the shoots to emerge later.
Step 4: The top layer for March
The topmost planting layer is intended for small and early-flowering bulbous plants. Crocuses, snowdrops and grape hyacinths are classic early-flowering varieties for this position. As these bulbs are smaller, they require less planting depth. Spread them evenly over the compost and ensure there is sufficient spacing between them. This can make the planter look particularly lush very early in the spring, especially with a dense planting scheme.
Step 5: Cover with soil and water
Finally, cover all the bulbs with a layer of soil about 3 to 5 cm deep. Press the compost down lightly without compacting it too much, then water thoroughly. The planter should then be overwintered in a suitable location. The compost must not be permanently wet, but should not be allowed to dry out completely either. A balanced moisture level is important to allow the bulbs to form roots.
Ready-made combinations for long-lasting, staggered flowering
With a variety of colours and flowering times, you can create a continuously flowering planter entirely to your own taste. Combinations in which both the flowering times and the colour tones complement each other look particularly harmonious:
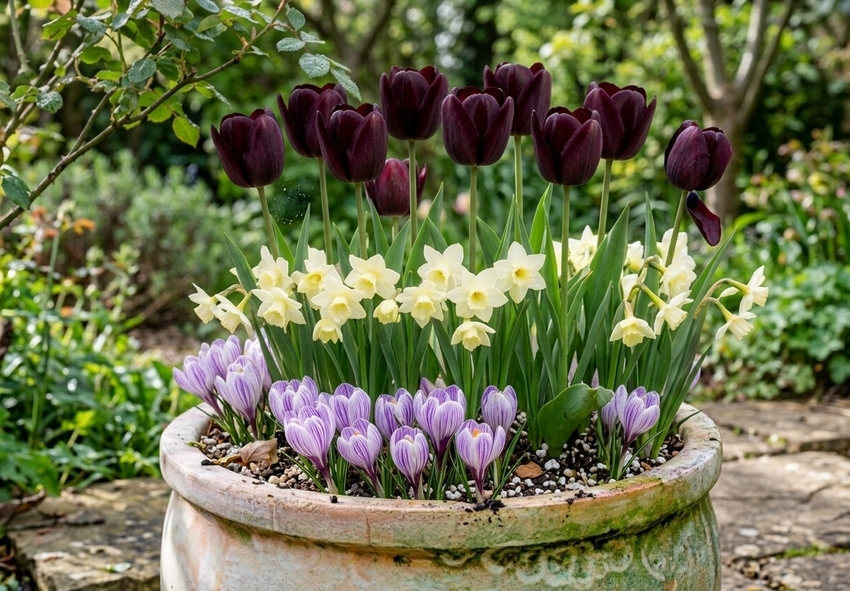
- Elegant and rich in contrast: Plant ‘Queen of Night’ tulips at the bottom to flower in May. In the middle layer, add ‘Thalia’ daffodils, which provide a bright contrast with their white flowers in April. At the top, the ‘Pickwick’ crocus blooms in white and violet in March.
- Tone-on-tone: Combine late-flowering pink tulips with hyacinths in similar shades of pink or violet. Add violet crocuses or grape hyacinths to the top layer to create a gentle transition between the flowering periods.
- Sunny spring mix: Yellow or orange late-flowering tulips form the bottom layer. Yellow daffodils can grow on top of these, whilst small yellow crocuses herald the arrival of spring as early as March.
When choosing colour combinations, it’s worth considering not only the flower colour but also the respective flowering period. This ensures the planter remains attractive for as long as possible, even if the individual varieties appear one after the other.
Overwintering and caring for the planter
Flower bulbs in a planter are more exposed to the cold than those in open garden soil. Whilst the soil in a bed provides a natural protective layer, a small pot can freeze right through on all sides. Suitable winter protection is therefore particularly important in regions with severe and prolonged frosts.
If necessary, wrap the frost-resistant planter in jute or insulating material and place it in a sheltered spot, for example close to a house wall. In the event of very severe frost, the planter can also be protected in a frost-free but cool garage or an unheated greenhouse.
Check the moisture level of the growing medium occasionally during the winter. Waterlogging must be avoided at all costs. In spring, the water requirement increases as growth becomes active. As soon as the first shoots appear, you should water regularly without over-saturating the planter.
Create your own spring garden in a planter now
Using the lasagne method, you can create an impressive succession of blooms from March to May, even in a small space. By layering flower bulbs according to their flowering time and size, you can create a vibrant spring garden in a single planter. Choose your favourite varieties now and discover suitable flower bulbs for container planting in the Dutch-bulbs.com catalogue. This way, you can lay the foundations for a colourful spring on your balcony or terrace as early as autumn!
Frequently Asked Questions (FAQs) about the Lasagne Method
1. What is the Lasagne Method for planting flower bulbs?
The Lasagne Method is a container planting technique where different types of flower bulbs are planted in layers at different depths. Bulbs with later flowering periods are usually planted deeper, while earlier flowering bulbs are placed closer to the surface. This creates a succession of blooms from March through May.
2. Which bulbs are best for a Lasagne Method container?
Tulips, daffodils, hyacinths, crocuses, muscari, and small iris varieties are popular choices for layered bulb containers. The best combination includes bulbs with different flowering periods and suitable planting depths. Choosing early-, mid-, and late-season varieties can help create a colorful display that lasts throughout the spring.
3. How deep should bulbs be planted using the Lasagne Method?
Bulbs should generally be arranged according to their recommended planting depths. Larger bulbs are usually placed in the deepest layer, while smaller bulbs can be planted above them. Leave enough soil between layers so roots and shoots have room to grow. Always follow the recommended planting instructions for each bulb variety.
4. Can I use the Lasagne Method in a small pot?
Yes, but the pot must be deep enough to accommodate several bulb layers and provide sufficient soil around the roots. A wider, deeper container generally produces better results than a shallow pot. If space is limited, use fewer layers and select smaller bulbs that have similar growing requirements.
5. How do I care for a Lasagne Method pot during winter?
Place the container in a suitable outdoor location where the bulbs can experience the cold conditions required for spring flowering. Keep the soil lightly moist but avoid waterlogging, as excess moisture can cause bulbs to rot. Protect containers from severe freezing temperatures and ensure drainage holes remain clear throughout winter.
Published: 04.09.2026