Lilies are a beloved addition to any garden, known for their stunning blooms and delightful fragrance. Propagating lilies allows gardeners to expand their collection, create new plants from existing ones, and enjoy these beautiful flowers in abundance. Understanding the basics of lilies propagation can help you achieve a flourishing garden filled with these elegant plants.
Understanding Lilies Propagation
Propagating lilies involves creating new plants from existing lily bulbs or seeds. This process not only helps in maintaining the health and diversity of your garden but also offers a cost-effective way to increase your lily population. By propagating lilies, gardeners can ensure a continuous display of these magnificent blooms, experiment with different varieties, and share their favorite lilies with friends and family. Our blog is the best place to find all the tips you need.
Types of Lilies for Propagation

When it comes to propagating lilies, selecting the right variety is crucial. Different types of lilies have distinct characteristics and propagation methods, which can influence the success rate and growth of the new plants.
Common Lily Varieties
Several lily species are popular among gardeners for their ease of propagation and striking beauty. Here are a few common varieties suitable for propagation:
| Lily Variety | Hardy | Flowering Period | Suitable Soil | Propagation Method |
| Asiatic Lilies | Yes | Early to mid-summer | Well-drained, slightly acidic to neutral (pH 6.0-7.0) | Bulb Division |
| Oriental Lilies | Yes | Mid to late summer | Well-drained, acidic (pH 5.5-6.5) | Bulb Division, Scaling |
| Trumpet Lilies | Yes | Mid-summer | Well-drained, slightly acidic to neutral (pH 6.0-7.0) | Bulb Division |
| Martagon Lilies | Yes | Early summer | Well-drained, slightly acidic to neutral (pH 6.0-7.0) | Bulb Division, Seed Propagation |
Hybrid Lilies
Hybrid lilies combine the best traits of different lily species, resulting in plants with unique characteristics and improved resilience. Propagating hybrid lilies can be particularly rewarding, as it allows gardeners to cultivate plants with enhanced beauty, fragrance, and disease resistance.
- LA Hybrids
A cross between Longiflorum and Asiatic lilies, LA hybrids are known for their large, showy flowers and robust growth. They are easy to propagate and make an excellent choice for gardeners looking to add bold colors to their landscape.
- OT Hybrids
These hybrids, also known as Orienpet lilies, are a combination of Oriental and Trumpet lilies. They produce huge, fragrant blooms and have a strong growth habit, making them a favorite for propagation and garden display.
- LO Hybrids
Combining Longiflorum and Oriental lilies, LO hybrids offer the best of both worlds with their fragrant, long-lasting flowers and sturdy stems. They are suitable for propagation and thrive in well-drained soil with plenty of sunlight.
Methods of Lilies Propagation

Propagating lilies can be accomplished through several effective methods. Each technique has its unique steps and benefits, providing gardeners with various ways to increase their lily population and enjoy these beautiful flowers.
Bulb Division
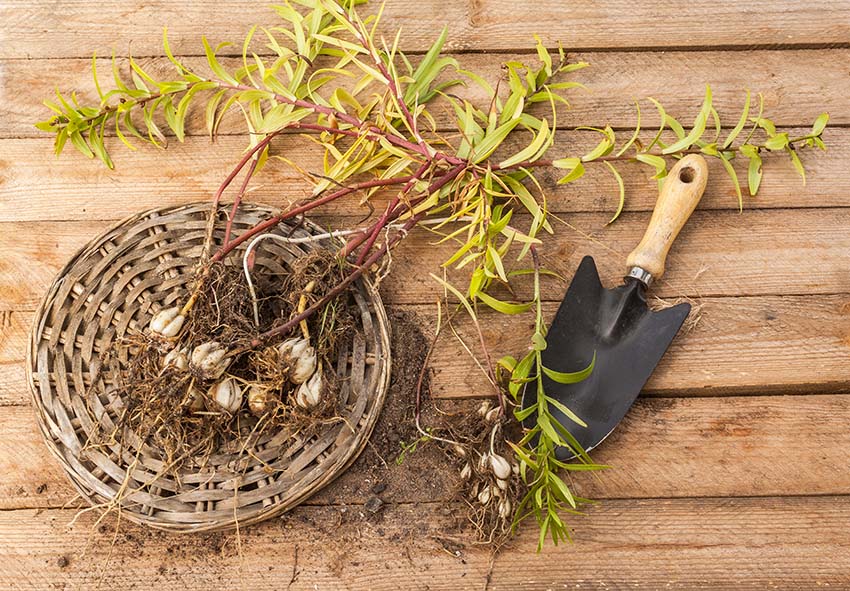
Dividing lily bulbs is a straightforward and reliable method for propagation, especially for established clumps of lilies that have grown crowded. This technique involves separating offsets, or baby bulbs, from the parent bulb and planting lily bulbs individually. The best time to divide lily bulbs is in the fall, after the foliage has died back but before the ground freezes. This timing allows the new divisions to establish roots before winter.
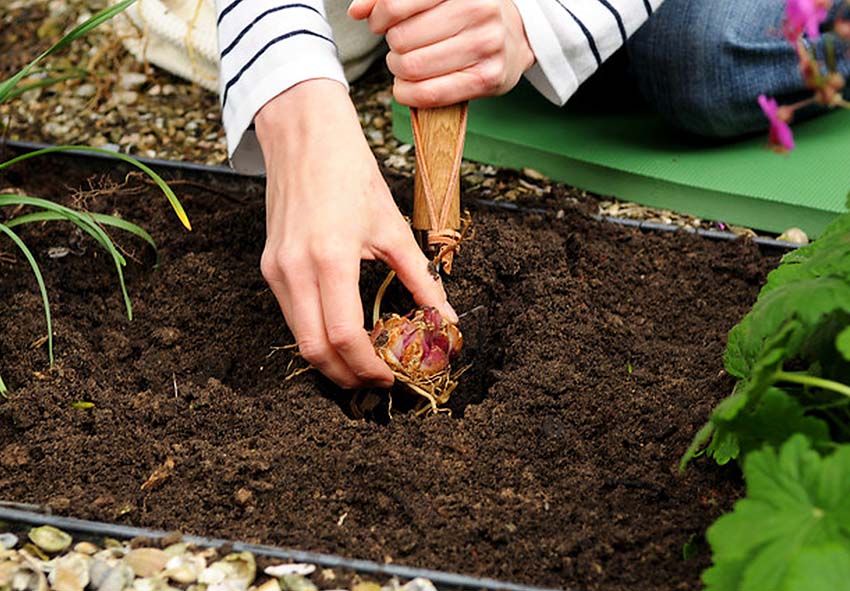
Carefully dig around the clump of lilies with a garden fork or spade, taking care not to damage the bulbs. Lift the clump out of the ground and gently shake off excess soil. Identify the offsets attached to the parent bulb. These smaller bulbs should be carefully separated from the parent bulb by gently twisting or cutting them away, ensuring each offset has its roots intact. Check the bulbs for any signs of disease or damage. Discard any unhealthy bulbs. Dust the healthy bulbs with a fungicide to prevent fungal infections. Prepare the new planting site with well-drained soil enriched with compost. Plant the parent bulb and offsets at a depth of about 6 inches, spacing them 12 to 18 inches apart. Water the newly planted bulbs thoroughly and apply a layer of mulch to protect them over winter.
Seed Propagation
Growing lilies from seeds is a rewarding but more time-intensive method compared to bulb division. This technique allows for the creation of new hybrids and the preservation of unique genetic traits. Here’s how to propagate lilies from seeds:
- Collecting Seeds: Allow lily seed pods to mature on the plant. Once the pods turn brown and start to split open, collect the seeds. Clean the seeds thoroughly to remove any debris.
- Stratifying Seeds (if needed): Some lily seeds require a period of cold stratification to break dormancy. Place the seeds in a moist medium such as peat moss or vermiculite, and store them in a refrigerator for 6 to 8 weeks.
- Sowing the Seeds: Fill seed trays or pots with a well-draining seed-starting mix. Sow the seeds on the surface and cover them lightly with a thin layer of the mix or sand. Water the seeds gently to avoid displacing them.
- Providing Optimal Conditions: Place the seed trays in a warm, bright location with indirect sunlight. Maintain consistent moisture by misting the soil regularly. Germination can take several weeks to months, depending on the lily variety.
- Transplanting Seedlings: Once the seedlings have developed a few sets of true leaves, they can be transplanted into individual pots or directly into the garden. Harden off the seedlings by gradually exposing them to outdoor conditions before planting them in their permanent location. It may take several years for seed-grown lilies to mature and produce flowers, so patience is essential.
By mastering these propagation techniques, you can successfully expand your collection of lilies and enjoy their stunning blooms and delightful fragrance year after year. Each method has its own charm and challenges, offering different ways to grow these beautiful plants and enhance your garden.
Scaling
Scaling is a method used to propagate lilies by removing and planting the outer scales of a lily bulb. Choose a healthy, disease-free lily bulb for scaling. Gently remove several outer scales from the bulb, being careful not to damage the basal plate where the scales are attached. Dust the scales with a fungicide to prevent rot and fungal infections. Place the treated scales in a plastic bag with a moist medium like vermiculite or peat moss. Seal the bag and store it in a warm, dark place for several weeks. Check regularly for the development of bulbils (tiny bulbs) at the base of the scales. Once bulbils have formed, plant them in pots or directly in the garden, ensuring they have well-drained soil and adequate water. Scaling is an effective method for multiplying lily plants, especially for rare or valuable varieties.
Care Tips After Propagation

Once you’ve successfully propagated your lilies, proper care is essential to ensure they thrive in their new environment. From transplanting to ongoing maintenance, following these care tips will help your lilies grow healthy and strong, rewarding you with beautiful blooms.
Transplanting
Transplanting propagated lilies into the garden requires careful handling to ensure the young plants establish well and continue to grow vigorously. Transplant your propagated lilies in the early spring or fall. These seasons provide moderate temperatures and adequate moisture, helping the lilies establish roots without the stress of extreme weather conditions. Select a location with well-drained soil and plenty of sunlight. Lilies thrive in areas that receive at least six hours of direct sunlight per day. Amend the soil with organic matter, such as compost, to improve drainage and fertility.
Dig holes that are about 6 inches deep and wide enough to accommodate the bulbs or seedlings. Place each bulb or seedling in the hole, ensuring the roots are spread out. Cover with soil and gently firm it around the plant. Space the lilies 12 to 18 inches apart to allow for adequate air circulation and room for growth. Water the newly transplanted lilies thoroughly to settle the soil around the roots. Keep the soil consistently moist but not waterlogged during the establishment period.
Maintenance
Proper maintenance is crucial to support the growth and blooming of your propagated lilies. Follow these tips to ensure your lilies remain healthy and vibrant:
- Mulching: Apply a layer of mulch around the base of the lilies to help retain soil moisture, suppress weeds, and regulate soil temperature. Organic mulches such as straw, shredded bark, or compost work well.
- Fertilizing: Feed your lilies with a balanced, slow-release fertilizer in the spring as new growth emerges. Avoid high-nitrogen fertilizers, which can promote excessive foliage growth at the expense of blooms. A second application of fertilizer can be made in mid-summer to support blooming and bulb development.
- Staking: Tall lily varieties may require staking to prevent the stems from bending or breaking under the weight of the flowers. Install stakes early in the growing season and tie the stems loosely to the stakes with soft ties or twine.
- Deadheading: Remove spent flowers promptly to encourage the plant to focus its energy on bulb development rather than seed production. Cut the flower stalks down to the base once all the blooms have faded.
- Pest and Disease Control: Monitor your lilies regularly for signs of pests or diseases. Common pests include aphids, lily beetles, and slugs, which can be controlled with insecticidal soap or hand-picking. Fungal diseases like botrytis blight can be managed by ensuring good air circulation, avoiding overhead watering, and applying fungicides if necessary.
- Winter Protection: In colder climates, provide winter protection for your lilies by applying a thick layer of mulch after the ground freezes. This helps insulate the bulbs and prevent frost damage. In spring, remove the mulch gradually as temperatures rise and new growth appears.
Troubleshooting Common Issues

Even with the best care, propagated lilies can sometimes face challenges. Understanding how to manage pests, diseases, and environmental stress can help ensure your lilies remain healthy and vibrant.
Environmental Stress
Environmental stress can significantly impact the health and growth of propagated lilies. Here are tips for addressing common stress factors:
- Heat Stress
Lilies may wilt or show scorched leaves in extreme heat. Provide shade during the hottest part of the day and ensure consistent watering.
Cold Stress: Protect lilies from frost by applying a thick layer of mulch in late fall. In colder climates, consider using cloches or frost blankets during unexpected cold snaps.
- Water Stress
Overwatering: Ensure proper soil drainage to prevent waterlogged conditions that can lead to root rot. Water lilies deeply but infrequently, allowing the soil to dry out slightly between waterings.
Underwatering: During dry periods, water lilies regularly to maintain consistent soil moisture. Mulching can help retain soil moisture and reduce evaporation.
- Nutrient Deficiencies
Yellowing Leaves: This can be a sign of nitrogen deficiency. Apply a balanced, slow-release fertilizer in spring and mid-summer to ensure your lilies receive adequate nutrients.
Poor Flowering: A lack of phosphorus can result in poor blooming. Use a fertilizer high in phosphorus to promote flower development.
- Soil Problems
Compacted Soil: Compacted soil can hinder root growth and water penetration. Aerate the soil around your lilies and amend it with organic matter to improve its structure and drainage.
Incorrect pH: Lilies prefer slightly acidic to neutral soil (pH 6.0-7.0). Test the soil pH and amend it with lime or sulfur as needed to adjust the pH to the optimal range.
Conclusion
Propagating lilies is a rewarding and enriching experience that every gardener should try. Whether you’re a novice gardener or an experienced horticulturist, the process of growing new lilies from existing plants allows you to expand your garden, experiment with different varieties, and share the joy of these beautiful flowers with others. By following the detailed steps and care tips outlined in this article, you can successfully propagate lilies and enjoy their stunning blooms year after year. You can find even more useful information in the ultimate guide to lilies. Happy gardening!
Frequently Asked Questions (FAQs) about Lilies Propagation
1. What is the best time of year to propagate lilies?
The best time to propagate lilies is in the fall, after the foliage has died back. This allows the bulbs to establish roots before winter. However, some propagation methods, like scaling, can also be started in early spring.
2. How often should I water newly propagated lilies?
Newly propagated lilies should be watered regularly to keep the soil consistently moist but not waterlogged. Water deeply once a week, and adjust frequency based on weather conditions. Avoid overhead watering to reduce the risk of fungal diseases.
3. Can I order lilies from your online store?
Yes! Our online store Dutch-Bulbs.com offers a wide selection of lilies plants, including different varieties and colors. We take pride in providing top-quality plants that are carefully cultivated and shipped with care to ensure they reach you in perfect condition.
4. Can lilies be propagated from seeds, and how long does it take for them to bloom?
Yes, lilies can be propagated from seeds, but it is a time-consuming process. It can take 2 to 7 years for seed-grown lilies to mature and produce flowers, depending on the variety. Patience and proper care are essential for successful seed propagation.
5. What are common pests and diseases that affect lilies, and how can I manage them?
Common pests include aphids, lily beetles, and slugs, while diseases like botrytis blight and basal rot can also affect lilies. To manage these issues, use insecticidal soap for pests, apply fungicides for fungal diseases, and practice good garden sanitation by removing plant debris and ensuring proper spacing for air circulation.
Published: 16.05.2024

Comments: 1
24.07.2025 at 18:04
I found this article on lily propagation really helpful! As a beginner gardener, I was unsure about how to care for my lilies. Your tips on watering and fertilizing have already made a big difference. Thank you for sharing your expertise!