Anemones: Care Guide for Flower
Anemones are known for their delicate, yet vibrant blooms that can brighten up any garden or floral arrangement. With their wide range of colors and unique petal shapes, these flowers add a touch of elegance and charm wherever they are planted. Native to Europe and Asia, they have become a popular choice for gardeners and florists alike due to their long-lasting blooms and versatile nature. Anemones come in various species, each with its own distinct look, making them perfect for creating diverse and visually appealing landscapes. Whether you’re looking to brighten a garden bed or enhance a bouquet, anemones are sure to bring a stunning, eye-catching element to any setting. Our gardening blog is a perfect place to find all the information you need!
Why Choose Anemones for Your Garden or Home?

Anemones are an excellent choice for both novice and experienced gardeners. Their wide range of colors, long blooming season, and low-maintenance nature make them a versatile option for gardens and homes.
Anemones are available in an array of colors, from soft pastels to bold, rich hues. Whether you’re looking for delicate pinks, bright reds, or cool blues, there’s an Anemone variety to suit your garden’s aesthetic. Anemones typically bloom in the spring and fall, providing continuous color in your garden. Some species, like the Japanese Anemone, bloom well into the autumn months, extending the season of interest in your yard.
Anemones are relatively low-maintenance, making them ideal for gardeners who may not have much time to dedicate to their plants. They thrive in well-drained soil and require minimal care once established. Anemones are not a common target for pests, which makes them a hassle-free addition to your garden. They naturally resist many common garden pests, allowing them to flourish without much interference.
Anemones make stunning cut flowers, which are popular in floral arrangements. Their striking appearance, combined with their long vase life, makes them a favorite among florists. Anemones are a beautiful and practical choice for any garden or home, offering color, ease of care, and versatility.
The Most Popular Anemones Varieties and Their Characteristics
Anemones come in a variety of species, each offering something unique to gardeners and floral designers. From classic white blooms to exotic bi-colored varieties, here are some of the most popular Anemones and what makes them stand out:
- Japanese Anemones: Known for their delicate, soft petals and large blooms, these varieties are perfect for creating a tranquil, naturalistic garden setting.
- Wood Anemones: These varieties are ideal for shaded areas and offer delicate white flowers that appear in early spring.
- Ranunculus Anemones: Often seen in floral arrangements, these varieties boast striking petals with a vibrant color palette.
- California Anemones: With vivid red, pink, and purple blooms, these species are perfect for adding pops of color to your garden.
- Pasque Flowers: These early-blooming Anemones are appreciated for their purplish-blue flowers and unique, feathery foliage.
Each variety has its distinct appeal, offering something for every garden style and personal taste.
Classic White and Cream Anemones
White and cream-colored Anemones have long been favorites for gardeners and florists. These classic varieties, such as ‘Honorine Jobert’ and ‘Mount Everest,’ are known for their large, single blooms and elegant appearance.
- ‘Honorine Jobert’: This variety produces large, semi-double flowers in pure white, with golden centers that attract pollinators. It’s a late-blooming variety, adding beauty to gardens in the fall.
- ‘Mount Everest’: Another white Anemone, ‘Mount Everest’ stands out for its tall, upright stems and elegant blossoms. It’s a perfect choice for adding structure and sophistication to garden borders.
These white varieties are ideal for creating a serene, classic look in the garden, often planted alongside other flowers for contrast.
Bright and Vibrant Anemones for Colorful Gardens
If you’re looking for a pop of color in your garden, bright and vibrant Anemones like ‘Hollandia’ and ‘The Governor’ are perfect options.
- ‘Hollandia’: This stunning red variety features rich, crimson petals with a dark center, making it an excellent choice for creating bold focal points in your garden beds.
- ‘The Governor’: Known for its large, bright blue flowers with white centers, ‘The Governor’ is a showstopper that can add a touch of drama and contrast to any garden.
Both of these vibrant varieties thrive in full sun, making them perfect for adding color to sunny spots or flower beds that need an extra burst of life.
Soft Pastel Anemones for a Delicate Look
For a more understated, gentle aesthetic, pastel-hued Anemones like ‘Pink Sylphide’ and ‘Ruffled Swan’ are ideal. These varieties feature soft, muted colors and a delicate presence that fits perfectly in tranquil garden settings.
- ‘Pink Sylphide’: This variety showcases pale pink petals that gently fade to white at the edges, creating a soft and romantic look. It’s perfect for cottage gardens or mixed floral beds.
- ‘Anemone Blanda Mix’: Sofr combination of light pink to lavender hues, every flower has frilly petals that resemble a soft, fluffy cloud, adding an elegant touch to any floral arrangement or garden setting.
These pastel varieties are perfect for creating a peaceful atmosphere and blending harmoniously with other soft-colored plants in your garden.
Exotic and Bi-Colored Anemones
Exotic and bi-colored Anemones, like ‘Mistral Bicolor’ and ‘Blue Poppy,’ add an unexpected twist to gardens with their unique color combinations.
- ‘Mistral Bicolor’: This variety features striking petals that transition from a deep purple center to soft white edges, creating a dramatic effect in any garden. It’s an eye-catching choice for those looking to add something special to their garden.
- ‘Anemone De Caen Collection’: Known for its unusual blue, purple and velvet flowers, complemented with some classic cream white hues, this mix adds a cool, exotic vibe to your garden.
These rare varieties are perfect for gardeners who want to add a touch of the unexpected and create a garden with standout features.
How to Plant and Grow Anemones Successfully
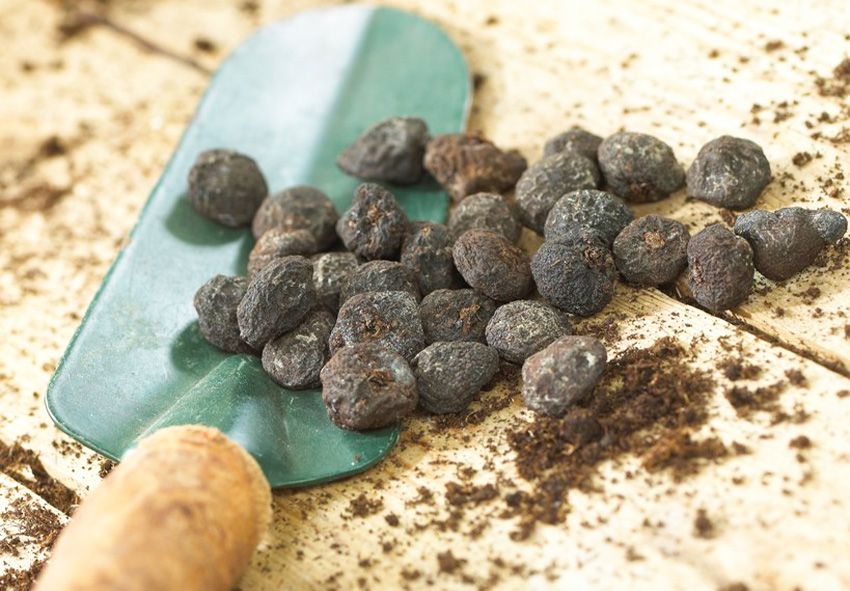
Anemones are beautiful, delicate flowers that bring vibrant color and elegance to any garden or landscape. Growing them successfully requires attention to a few essential details, including choosing the right corms, preparing the soil, and providing the correct care. By following a step-by-step guide, you can ensure your Anemones grow healthy and bloom beautifully year after year.
These flowers thrive in well-drained soil and need proper spacing, light, and moisture. With the right planting techniques, Anemones will reward you with long-lasting blooms that add visual appeal and charm to any space. Whether you’re planting them in the ground or in containers, providing the best conditions from the start is key to healthy growth and vibrant flowers.
By understanding the needs of Anemones and giving them the right environment, you can enjoy these striking plants in your garden and floral arrangements. In the following steps, we will guide you on how to successfully plant and grow Anemones, ensuring your garden is filled with their breathtaking blooms.
Step-by-Step Guide to Planting Anemones
To plant Anemones successfully, start by selecting healthy corms. Soak them for a few hours and pre-sprout if desired. Choose a well-draining, fertile location with the right pH, and plant corms 1-2 inches deep, spaced 4-6 inches apart. Water lightly, ensuring the soil remains moist but not soggy.
Step 1: Choosing Healthy Anemone Corms
When planting Anemones, selecting healthy corms is crucial to ensuring successful growth. Look for corms that are plump, firm, and free from any signs of rot or shriveling. Healthy corms should feel solid and strong to the touch, with no soft or mushy spots. Avoid corms that appear dry, cracked, or damaged, as these are likely to produce weak plants or fail to sprout altogether. Inspect each corm closely, as any signs of deterioration can indicate poor quality or disease.
Fresh corms with no visible defects are the best choice, as they are more likely to establish strong root systems and produce vibrant flowers. It’s also essential to select corms that are of appropriate size and shape, as overly small or irregularly shaped corms may struggle to grow. By investing in high-quality, healthy corms, you ensure that your Anemones have the best possible start and can thrive in your garden or home.
Step 2: Choosing the Right Soil and Location
The right soil and location are essential for the successful growth of Anemones. Anemones thrive in well-draining, fertile soil with a slightly acidic to neutral pH, ideally between 6.0 and 6.5. This ensures that the roots have access to the necessary nutrients without being waterlogged. Be sure to choose soil that doesn’t retain too much moisture, as Anemones are susceptible to root rot in overly damp conditions. A light, loamy soil works best, as it allows for adequate drainage while providing enough fertility for healthy growth.
When selecting a location, Anemones prefer a spot with full sun to partial shade. In warmer climates, a location with some afternoon shade is ideal, as this prevents the flowers from being scorched by the intense midday sun. In cooler climates, they thrive in full sun, which promotes strong blooms. Make sure the spot is free from heavy foot traffic, as Anemones require a peaceful environment for proper growth and establishment. The right combination of soil and location will provide the foundation for a flourishing Anemone garden.
Step 3: Soaking and Pre-Sprouting Anemone Corms
Soaking and pre-sprouting your Anemone corms before planting can help jump-start their growth and encourage healthier plants. To do this, soak the corms in room-temperature water for 3-4 hours before planting. This will rehydrate the corms and make them more pliable, which helps them sprout more easily once planted. After soaking, you can pre-sprout the corms by placing them in moist soil at a temperature of around 10-12°C (50-55°F). This step is optional but can help speed up the growth process, especially in cooler climates.
Pre-sprouting encourages early root development and allows you to get a head start on planting, especially if you’re looking to have your Anemones bloom earlier in the season. Once you notice small roots or shoots emerging, the corms are ready to be planted in the ground or in pots. This process ensures that your Anemones are off to a strong start and will begin growing vigorously as soon as they are planted.
Step 4: Proper Planting Depth and Spacing
Planting Anemone corms at the correct depth and spacing is crucial for healthy growth. Dig a hole about 1-2 inches deep for each corm, ensuring that the pointed side of the corm faces downward. Planting them the right way ensures that the roots can grow in the correct direction and establish themselves properly. It’s important to space the corms 4-6 inches apart to give them enough room to grow and spread.
Adequate spacing also ensures good air circulation around each corm, which helps prevent fungal diseases and encourages strong plant development. Avoid planting them too close together, as overcrowding can stunt growth and lead to poor flowering. After planting, gently cover the corms with soil and press down lightly to eliminate air pockets. Proper planting depth and spacing are key to giving your Anemones the best chance of thriving in your garden.
Step 5: Watering After Planting
Watering your Anemones correctly after planting is essential for their success. Immediately after planting, water the corms lightly to settle the soil around them. Keep the soil moist but not soggy, as Anemones do not tolerate excess moisture. Overwatering can lead to root rot, a common problem that can ruin your Anemone plants. Ensure the soil drains well, as standing water can damage the corms and hinder growth. Water gently, allowing the soil to absorb moisture slowly.
Once the plants are established, Anemones are relatively drought-tolerant, but they will still benefit from consistent moisture, especially during dry periods. During the growing season, check the soil regularly and water when necessary, making sure the soil remains slightly moist but never waterlogged. This careful approach to watering will help maintain the balance between sufficient moisture and good drainage, allowing your Anemones to grow strong and produce beautiful flowers.
Essential Anemone Care Tips for Healthy Growth

Anemones are relatively low-maintenance flowers, but like all plants, they require proper anemone bulb care to thrive. To ensure healthy growth and beautiful blooms, it’s essential to provide the right light, water, temperature, and feeding conditions. By meeting these needs, you can enjoy vibrant Anemones that last for years.
Anemones prefer a location with good sunlight, though they tolerate light shade. They thrive in well-draining, fertile soil and should not be waterlogged. Proper watering and feeding are crucial, and so is protecting them from extreme weather conditions, such as strong winds and frosts. Anemones should be watered deeply, ensuring their roots stay moist but not soggy. Regular feeding with a balanced fertilizer helps encourage strong growth and abundant blooms.
As Anemones grow, they may need support, especially taller varieties, to prevent their stems from bending or breaking. Regular monitoring of their health and conditions will help you address any problems early, allowing you to maintain a beautiful Anemone garden. By following these care tips, you can ensure your Anemones remain healthy, vibrant, and long-lasting in your garden.
How to Care for Anemones After Planting
It’s important to know how to care for anemones in the garden just as to learn how to care for anemones indoors. After planting, water Anemones deeply, ensuring the soil remains moist but not soggy. Fertilize with a balanced liquid fertilizer every 3-4 weeks until buds form. Provide full sun or light shade, and protect from frost and strong winds. Use supports for taller varieties to prevent bending.
Step 1: Watering Anemones the Right Way
Proper watering is essential to the health of your Anemones. Water them deeply once or twice per week, depending on the weather. If the weather is hot or dry, they may need more frequent watering to prevent the soil from drying out. It’s important to avoid overwatering, as this can lead to root rot, which Anemones are particularly sensitive to. When watering, try to water at the base of the plant and avoid overhead watering. Overhead watering can create a humid environment that encourages fungal diseases, such as powdery mildew.
Watering at the soil level helps ensure that the roots receive the moisture they need while keeping the leaves and flowers dry, reducing the risk of disease. During the growing season, check the moisture levels of the soil regularly. Anemones prefer consistently moist soil, but they should never sit in standing water, as this can cause significant damage to the plant.
Step 2: Fertilizing for Strong Growth
Fertilizing Anemones is essential for promoting strong growth and vibrant blooms. Apply a balanced liquid fertilizer, such as a 10-10-10 formula, every 3-4 weeks during the growing season. This will provide the necessary nutrients to encourage healthy foliage and flower production. Be careful not to over-fertilize, as this can lead to weak, leggy growth and fewer blooms.
Once the flower buds begin to form, stop fertilizing to allow the plants to focus on blooming rather than growing new foliage. This is important for ensuring that the flowers remain vibrant and the plants don’t become too leafy. Additionally, avoid fertilizing Anemones during their dormant period, as they don’t need extra nutrients while not actively growing. By following this feeding schedule, your Anemones will have the nutrients they need to flourish without the risk of overfeeding.
Step 3: Providing Proper Light and Temperature
Anemones thrive in full sun but can tolerate light shade, especially in warmer climates. The right amount of light is crucial for encouraging strong, vibrant blooms. Aim to plant Anemones in a location that receives at least 4-6 hours of sunlight each day. If you live in a particularly hot climate, some afternoon shade can protect the plants from the harshest sun, preventing heat stress. Anemones also prefer cooler temperatures, with ideal growing conditions between 50-60°F (10-15°C). In regions with hot summers, providing some shade during the afternoon can help keep the plants from wilting or drying out.
It’s important to protect Anemones from sudden frost or strong winds, as these can damage delicate flowers and foliage. If frost is expected, consider covering the plants with a frost cloth or moving potted Anemones to a sheltered location. By providing proper light and temperature, you can ensure that your Anemones remain healthy and continue to bloom beautifully throughout the growing season.
Step 4: Supporting Tall Anemones
Tall varieties of Anemones may need additional support to prevent them from bending or breaking under their own weight, especially when the plants are in full bloom. Consider using plant supports, such as stakes or cages, to help keep the stems upright. This is particularly important for taller varieties, which can become top-heavy and prone to falling over. When placing supports, do so early in the growing season to avoid disturbing the roots later.
Additionally, pinch back any weak or spindly stems to encourage stronger, more compact growth. This will not only help the plant maintain its shape but also promote healthier blooms. Pinching back weak growth encourages the plant to focus its energy on the stronger stems, resulting in more vigorous and robust plants. With proper support, your Anemones will grow tall, straight, and strong, allowing you to enjoy their stunning flowers throughout the blooming season.
How to Encourage Your Anemones to Bloom Again
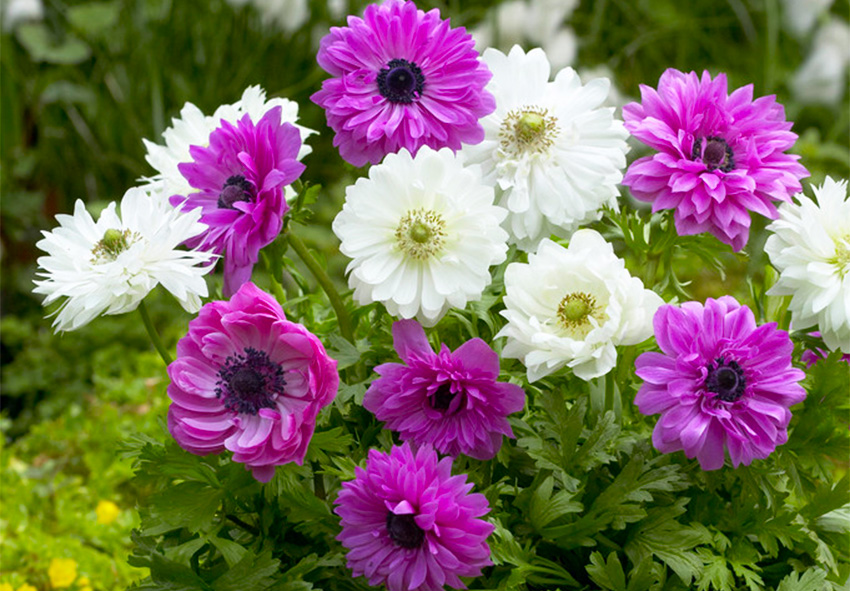
Anemones are beautiful perennials, but sometimes they may not rebloom as expected. This can happen due to various factors such as insufficient sunlight, improper watering, or lack of nutrients. Anemones typically bloom once a year, but with proper care, you can encourage them to bloom again or even extend their blooming season.
To improve flowering, it’s essential to maintain proper care throughout the growing season. Deadheading spent flowers, providing the right environment for dormancy, and dividing the corms every few years can help ensure your Anemones rebloom. Additionally, ensuring that the soil is well-draining and fertilizing appropriately can also play a role in encouraging healthy growth and blooms.
While Anemones naturally go through a period of dormancy, you can help rejuvenate them by providing the right conditions, such as proper moisture levels and sunlight. Following these steps can improve the likelihood of a second round of blooms, ensuring your garden remains vibrant.
Step-by-Step Guide to Ensuring Reblooming
To encourage Anemones to rebloom, start by deadheading spent flowers to promote new growth. Prepare them for dormancy by halting watering once the foliage dies back. Every 3-4 years, divide and transplant the corms to maintain vigor, ensuring they thrive and produce beautiful blooms year after year.
Step 1: Deadheading and Post-Bloom Care
One of the best ways to encourage Anemones to bloom again is by deadheading, or removing spent flowers. Deadheading prevents the plant from putting energy into seed production, allowing it to focus on producing more blooms. To deadhead properly, wait until the flowers begin to fade, then carefully trim the flower stems just above the first set of leaves. This will stimulate the plant to produce new flowers. In addition to deadheading, you should remove any yellowing or damaged foliage to keep the plant healthy. This helps the
Anemones conserve energy, focusing it on creating new growth. If you live in a warmer climate, your Anemones may bloom intermittently throughout the season, so it’s essential to continue deadheading to encourage the next bloom cycle. By keeping the plant tidy and removing old flowers and leaves, you create an environment that promotes fresh blooms. This simple step will significantly enhance the chances of your Anemones blooming again.
Step 2: Preparing Anemones for Dormancy
Anemones require a period of dormancy to ensure they grow strong and healthy the following year. After blooming, the foliage will begin to yellow and die back. At this point, stop watering the plant to allow the corms to dry out and rest. This dormant period is vital for rejuvenating the corms and encouraging future blooms. You can either leave the corms in the ground or lift them for storage, depending on your local climate. If you live in an area with cold winters, it’s often best to lift the corms, clean them, and store them in a cool, dry place until the next planting season. If you prefer to leave them in the ground, make sure the soil is well-draining to prevent waterlogging, which could lead to rot. Allowing the Anemones to rest during their dormant phase ensures that they have the energy needed to produce vibrant flowers when they emerge again in the spring.
Step 3: Dividing and Transplanting Anemones
Dividing and transplanting Anemones every 3-4 years is an effective way to maintain the plant’s vigor and encourage better blooms. Over time, Anemone corms can become overcrowded, leading to weaker plants with fewer flowers. To avoid this, dig up the corms in the fall once the foliage has died back. Gently separate the corms, being careful not to damage them, and discard any old or damaged corms. Replant the healthy corms in fresh, well-draining soil. Dividing the corms every few years not only promotes better blooming but also helps prevent disease buildup in the soil. Additionally, transplanting Anemones to a new location can encourage better growth and flowering. Anemones thrive in fertile, well-drained soil, and regular dividing ensures they continue to get the nutrients they need to bloom beautifully. By following this practice, your Anemones will stay strong and healthy, producing impressive flowers season after season.
Common Problems with Anemones and How to Fix Them

Anemones are generally low-maintenance, but like any plant, they can experience issues that hinder their growth or blooming potential. Identifying these problems early allows you to address them quickly and ensure the plant remains healthy. Below, we explore some common Anemone problems, their causes, and the best solutions for each one.
Troubleshooting Guide
Anemones are susceptible to a few typical issues that may affect their growth. This troubleshooting guide outlines the causes of the most common problems and the steps you can take to correct them, ensuring your Anemones remain strong and continue to thrive in your garden.
Issue 1: Anemones Not Blooming
Cause:
- Anemones may fail to bloom for a variety of reasons. One of the most common causes is exposure to excessive heat, which stresses the plant and inhibits its ability to flower. Another potential cause is a lack of nutrients.
- If the plant is not receiving enough food, it may not have the energy to produce blooms. Improper planting depth can also be a problem—if the corms are planted too deeply, they may struggle to grow and bloom effectively.
Solution:
- To encourage blooming, make sure your Anemones are planted in cooler conditions, as they thrive in temperatures between 50-60°F (10-15°C). Avoid areas with excessive heat, especially during the hottest parts of the day. Fertilize your Anemones with a balanced, slow-release fertilizer to ensure they receive the nutrients necessary for healthy growth and vibrant flowers.
- Be sure to plant your corms at the correct depth—around 1-2 inches deep, with the pointed end facing down. This depth allows the corms to establish properly and encourages blooming.
Issue 2: Yellowing Leaves or Weak Growth
Cause:
- Yellowing leaves or weak, spindly growth is a sign that your Anemones may be suffering from overwatering or a nutrient deficiency. Overwatering causes the soil to become waterlogged, which can suffocate the roots and lead to yellowing leaves.
- A lack of key nutrients—such as nitrogen, phosphorus, or potassium—can result in poor growth and discolored foliage. A deficiency in these nutrients can cause the plant to be weak, with leaves that turn yellow or brown and may fall off prematurely.
Solution:
- The first step to addressing yellowing leaves and weak growth is improving drainage. Ensure your Anemones are planted in well-draining soil that allows excess water to escape. If your plants are in containers, check that there are drainage holes to prevent water from collecting in the pot.
- Water the Anemones only when the top inch of soil feels dry, as overwatering is one of the most common causes of root rot and yellowing leaves. Additionally, use a balanced fertilizer, preferably one designed for flowering plants. Apply it every 3-4 weeks to restore the necessary nutrients. A healthy nutrient balance will encourage stronger, greener foliage and more robust growth.
Issue 3: Anemone Corms Rotting
Cause:
- Corm rot is often caused by poor soil drainage or excessive moisture. If Anemone corms are planted in soil that retains too much water, the corms can begin to rot.
- Waterlogged soil deprives the roots of oxygen, leading to the breakdown of the corms. This problem can occur if the planting site doesn’t have good drainage or if the corms are overwatered.
Solution:
- To prevent corm rot, make sure to plant Anemones in well-draining soil. Avoid heavy, clay-based soils that retain moisture. Adding organic matter like compost to the soil can improve drainage and provide nutrients. If you are planting in containers, ensure that your pots have proper drainage holes to allow excess water to escape. Additionally, avoid overwatering your Anemones.
- Allow the soil to dry out slightly between waterings, and always check that the soil isn’t waterlogged. If you live in a region with heavy rainfall, you may also want to mound the soil slightly to improve drainage and prevent standing water around the corms. Proper spacing of corms can also improve airflow around the roots, helping to prevent rot.
By identifying these common issues and applying the right solutions, you can keep your Anemones healthy and ensure they thrive year after year. Regular care, appropriate soil, and the right growing conditions will help avoid many of these problems and encourage lush, beautiful blooms.
Propagating Anemones: Growing More Beautiful Blooms

Propagating Anemones is a great way to expand your garden and enjoy more of these stunning blooms. There are two primary methods for multiplying Anemones: dividing corms and growing them from seeds. Both methods offer opportunities to grow healthy new plants, though they require different amounts of time and effort.
Dividing Anemone Corms is the most efficient and reliable method for propagation. This method involves digging up the corms after they have gone dormant in late summer. Anemones are perennials, so they rest during the warmer months, and this is the ideal time to divide them. Carefully separate the healthy offsets from the main corm and discard any damaged or diseased corms. Replant the offsets in fresh, well-draining soil for the next season. This method ensures the new plants will bloom the following year, making it the best choice for quickly multiplying your Anemone collection.
Growing Anemones from Seeds takes longer but can be a rewarding way to propagate these plants. Start by sowing the seeds in cool, sheltered conditions, as Anemones prefer cooler temperatures for germination. The seeds may take several weeks to germinate, and you’ll need to wait 1-2 years for the plants to mature and bloom. While slower, growing Anemones from seed can allow you to develop new varieties and expand your garden even further.
Both methods are effective, but dividing corms is the quickest way to achieve more blooms.
How to Propagate Anemones Step-by-Step
If you’re interested in multiplying your Anemones, there are two key propagation methods: dividing the corms and growing from seeds. Both methods can lead to successful new plants, though they require different timelines and care.
Step 1: Dividing Anemone Corms (The Best Method)
Dividing Anemone corms is the most efficient and reliable way to propagate these plants. The best time to divide the corms is in late summer, after the plant has gone dormant. At this time, the foliage will begin to yellow and die back, signaling that the plant is entering its rest phase. Gently dig up the corms from the soil and carefully separate the healthy offsets from the main corm. These smaller corms can be replanted in fresh soil for the next growing season. Make sure to discard any damaged or diseased corms to ensure healthy new growth. When replanting, place the corms in well-draining soil, and ensure the pointed side is facing down. This method is highly effective for producing strong, healthy plants, and the new Anemones will bloom the following spring or summer.
Step 2: Growing Anemones from Seeds
Growing Anemones from seeds is a more time-consuming process but can be rewarding if you’re looking to cultivate new varieties or increase your stock. The seeds should be sown in a cool, sheltered area, as Anemones prefer cooler temperatures for germination. Plant the seeds in well-draining, fertile soil, and cover them lightly. Keep the soil moist but not soggy, and place the seed trays in a spot that receives indirect light. Germination can take several weeks to months, and it’s essential to be patient during this stage. Once the seeds have sprouted, allow them to grow into young plants before transplanting them into the garden. Expect it to take 1-2 years before the plants are mature enough to bloom. This method requires more patience, but it is an excellent way to start new Anemone plants from scratch.
Frequently Asked Questions (FAQs) about Anemones
1. Can Anemones be grown indoors successfully?
Yes, Anemones can be grown indoors with the right conditions. Place them in a bright location with indirect sunlight and ensure they’re planted in well-draining soil. Keep the soil moist but not soggy. Indoor anemones do well in cooler temperatures, ideally between 55–65°F. They’re especially great for brightening up windowsills or indoor pots during late winter and early spring when outdoor blooms are still scarce.
2. When is the best time to plant Anemone bulbs?
The best time to plant Anemone bulbs, also called corms, depends on your climate. In warmer zones, plant them in the fall for early spring blooms. In colder zones, you can start them indoors in late winter or early spring and transplant them once the risk of frost has passed. Soak the corms for 12 hours before planting to help speed up germination and ensure strong growth.
3. How much sunlight do Anemones need?
Anemones prefer full sun to partial shade. In cooler climates, they thrive in full sun, while in hotter regions, some afternoon shade can protect them from harsh rays. Indoors, place them near a bright window with filtered light. Getting at least 4–6 hours of light daily ensures strong stems and vibrant blooms. If they’re not getting enough light, they may grow leggy or fail to flower properly.
4. Can I order anemones bulbs from your online store?
We’re pleased to offer Anemones for purchase through our online store Dutch-bulbs.com. Ordering from us is convenient, and we ensure that you receive high-quality, healthy tubers. Simply browse our store, choose your favorite Anemone varieties, and follow the easy ordering process to have them delivered to your doorstep, ready for planting.
5. Do Anemones come back every year?
Yes, Anemones can return year after year, especially in mild climates. They are technically perennials, though in colder zones they’re often grown as annuals unless lifted and stored. After the foliage dies back, allow the corms to rest in dry soil or dig them up and store them in a cool, dry place for replanting next season. With proper care and location, they can naturalize and bloom for many years.
Published: 08.04.2025
